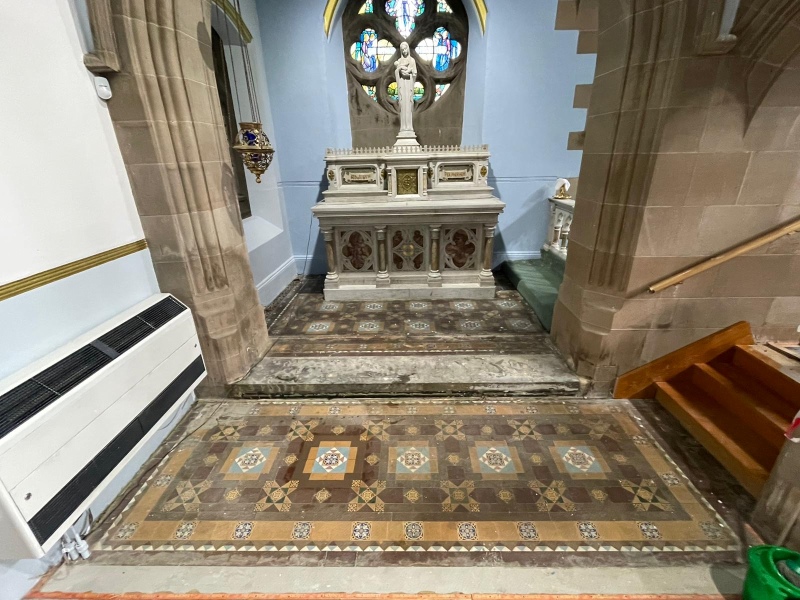
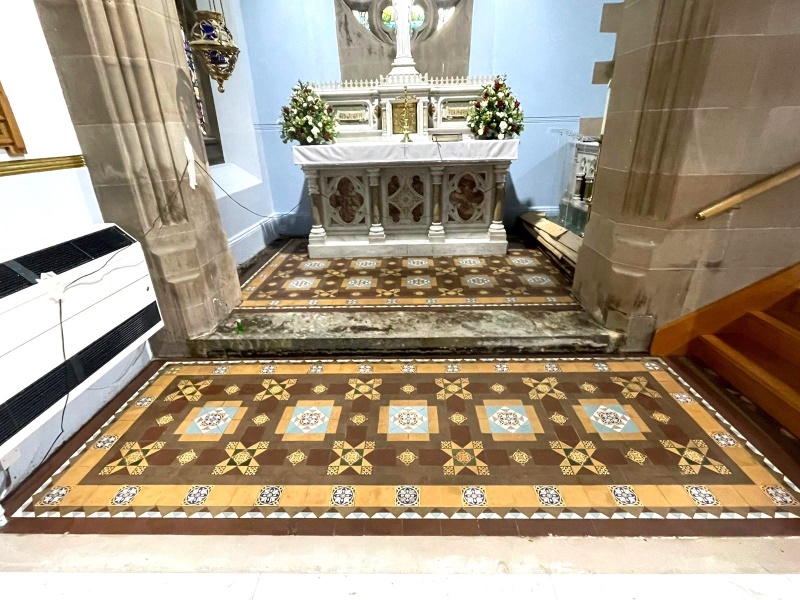
The pictures below were taken at St Marys Church in Coatbridge where I was asked to renovate an area of original Victorian tiles in front of the altar. The church was opened in 1893 and at some point since then the tiled chancel floor had been covered with carpet. Many years later the carpet was worn and rather than replacing it they decided to have the tiles renovated.
Renovating the tiles was the best way forward as old floors like this don’t have the benefit of a damp proof membrane (DPM) and so shouldn’t be covered up. You need to allow for moisture from under the floor to rise through the tile and evaporate at the surface otherwise the moisture can reach out to the walls and cause other problems.
Fortunately, by the time I was asked to survey the floor the carpet had been removed from the chancel and the intricate Victorian tiling work was now on display for the parishioners to appreciate. This had given then the tiles plenty of opportunity to breathe and allow any trapped moisture to evaporate.
Over the years the tiles had been subject to lots of traffic, paint, general wear and then of course hidden under a carpet. The tiles were part of the 150-year-old churches history and were crying out to be restored and shown off. Paint, stains, cement and carpet glue were found on the tiles when the carpet was lifted.

To work out the best way to effectively remove all the staining I conducted a test clean in a small area of the tiling. As it was a floor without a DPM I chose to use gel cleaning products with a low water content. This was done in-order to avoid exacerbating any inherent dampness in the floor that might lead to efflorescence salt problems later.
The test clean came out well and encouraged the floor was in safe hands and happy with my quotation I was awarded the contact to restore the floor.
Deep Cleaning a Victorian Tiled Church Chancel
I returned some weeks later to start on the restoration of the whole floor and began with the application of Tile Doctor Oxy-Gel which is a strong alkaline Gel cleaner that as mentioned earlier has a low moisture content.
Working in sections Oxy-Gel was applied with a brush and left on the tiles to soak in for about fifteen minutes. This gives the product time to break down the ingrained dirt, paint and cement residue. The Gel was the scrubbed into each tile using a coarse 200-grit pad fitted to a rotary floor buffer. Once the clean had been completed the now soiled Gel solution was removed with a wet vacuum. After this the tiles were rinsed with water and then dried with the wet vacuum.
The next stage of the clean was to treat the tiles to an acid rinse using Tile Doctor Acid Gel which was applied neat with a brush. Acid Gel does several things to improve the tiles including neutralising the pH level of the tiles and dissolving any efflorescent salts in the floor. After using a black pad to work the gel into the tiles the soiled Gel was extracted with the wet vacuum and then rinsed again using water before being dried again with the wet vacuum.
The floor was then left for a couple of days allowing plenty of time for the floor to dry out following the cleaning and to give any efflorescence salts trapped in the tiles had time to show up.
Sealing a Victorian Tiled Church Chancel
On my return a damp meter was used to confirm the floor was dry and the tiles inspected for efflorescence salts. All was well so I was able to begin the final stage of the renovation which involves applying a sealer to the tiles which will enhance their appearance and protect them from staining.
Tile Doctor Colour Grow was chosen to seal the tiles, it’s a hard-wearing impregnator that soaks into the tile occupying the pores and thereby preventing dirt from becoming ingrained there. This ensures dirt remains on the surface where it can easily be cleaned away. Colour Grow also contains a colour enhancer which lifts the beautiful colours in the Victorian tile and really helps them to stand out.
After the first coat had been on for 5 minutes any excess sealer was removed using a dry clean White cotton cloth. The second coat was applied after 30 minutes and again any excess sealer was removed with a cloth after 5 minutes.
After application the tiles were left to dry for two hours and then a water test was carried out to determine if the tiles needed a further coat.

Once complete the tiles looked totally transformed and took time to discuss aftercare cleaning. Its important to use the right product when cleaning a sealed tiled floor as anything bleach based will strip the sealer off with use leaving it vulnerable to ingrained dirt. In this case I recommended Tile Doctor Neutral Tile Cleaner which is a mild but effective tile cleaner that’s ideal for sealed floors.
Source: Victorian Floor Tile Cleaning and Sealing Products and Services in Coatbridge Lanarkshire